For some reason, the lockpicking system in Elder Scrolls Online was not obvious to me. Hopefully this guide will prove useful to anyone who has not yet mastered the art.
Lockpicking in ESO requires a lockpick and allows you to enter locked homes, open chests and open safeboxes. Lockpicks are often found in urns within dungeons and are also available to purchase from general merchants. The process of picking the lock is exactly the same regardless of whether your target is a door, chest or safebox. Successfully picking any lock will give you experience in the Legerdemain Skill Line and will supposedly make future attempts at lockpicking easier. When your character faces the lock you’re considering, a difficulty level will appear next to the prompt to pick the lock: Easy, Intermediate, Advanced and Master. Explaining the difference in these levels of locks will make more sense after learning how to pick locks in the first place.
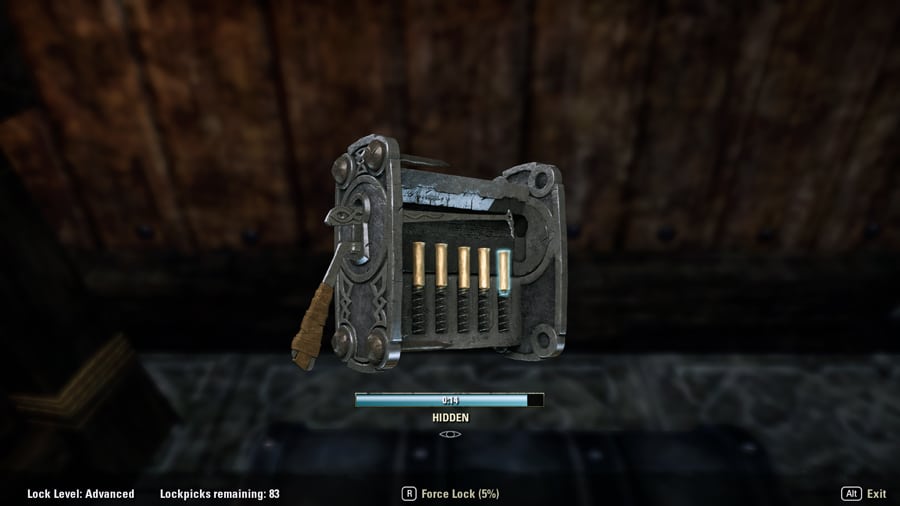
When you begin picking the lock you will see the screen shown below. Let’s work our way from top to bottom explaining what you are seeing on this screen.

The middle of the screen shows the lock you are picking, and it’s where the action will be taking place. Within the lock is the lockpick you are currently using. You can move it to the left and right by moving your mouse. Below the lockpick is a set of 5 brass pins on springs. You must position the lockpick over each pin with the mouse and then click to apply pressure to lower the pin. (This is the most important part of lockpicking, and we’ll come back to it soon.) Below the lock is a progress bar in bright blue counting down the number of seconds remaining in your attempt. If the timer runs out, have failed the attempt and must wait a short time before trying again. If sneaking while picking the lock, your status (hidden/detected) and the eye symbol is displayed. At the bottom of the screen is the difficulty level of the lock, the number of lockpicks in your inventory, and the option to force the lock [R] or cancel the attempt [Alt]. If time is running out and you’re not close to getting the lock open, you might as well try forcing the lock! Passive skills in the Legerdemain Skill Line will increase your chance of success at forcing locks. The probability of success in forcing the lock is shown as a percentage.
The objective is to press each of the pins into its correct position before the timer runs out. As you apply pressure to a pin, it will drop slowly. The pin will begin to shake visibly and make a metallic rattling sound when it approaches its correct position. When you see and hear these signs, release the left mouse button to release pressure from the pin. If you have let go too soon the pin will go back to the top position, and you’ll have to start all over again with that pin. If you wait too long to release the pressure, you break the lockpick (losing it), and the pin returns to its original position. Breaking a lockpick will lose you some time but does not stop the attempt unless the lockpick that broke was your last. If you release at just the right moment, the pin stays in the position you have lowered it into, and you are able to move on to the next pin. The pins can be worked in any order: start from the front, the back or wherever your lockpick first appears.
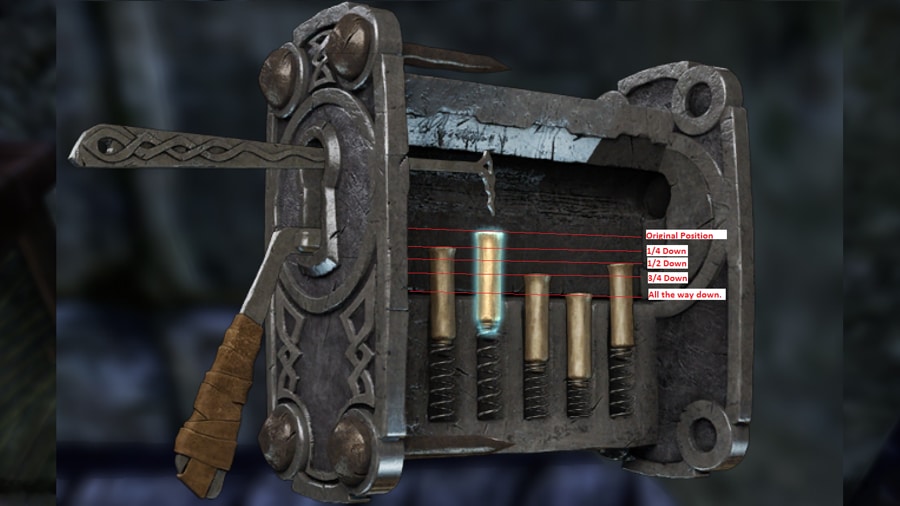
A helpful hint and something you will get a feel for as you gain experience lockpicking are the positions at which the pins will usually stop. These can be divided into quarters as the pin drops and are illustrated in the screenshot below. Pins will reach their correct position when they are ¼ lowered, ½ lowered, ¾ lowered or all the way down. If you can imagine these lines when you are lockpicking, it will let you anticipate where you’ll start hearing and seeing cues to release the pin.

So, back to lock difficulties. The difficulty of the lock determines how much time you have in your starting timer. You have much more time to work an “Easy” lock than a “Master” lock. Also the quality and/or quantity of the loot inside the chest will increase as the difficulty increases.
Some final reminders: First, only one person can pick a lock at a time. If you fail in your attempt at lockpicking there is a small cool-down period of a few seconds where someone else may swoop in and snatch your chest. Oh well. Second, breaking into houses or picking the lock on safeboxes is illegal. Take precautions not to be seen by NPCs during your attempt. Most importantly, recognize if the NPCs are walking a set path in the area and start your attempt as soon you’re no longer observed by the NPC. That will give you the most time possible to pick the lock and makes it less likely that you’ll be caught in the act and face a bounty. You can keep on picking the lock and stealing things inside even after you’ve been caught, but your bounty will increase further. Lastly, most chests will disappear after they have been looted. This is not the case in group delves around Tamriel so share the wealth with your running crew after you’ve taken your share!
I hope this was helpful! If you need a video demonstration, there are several good ones on YouTube. Feel free to shoot me a message in-game to Rhymnoceros. Good luck and happy plundering.

Wish I had seen this on day one. I had a very hard time mastering lock picking. Very well presented.